
There is something undeniably charming about a dessert that defies the standard 9×13 inch pan. Long before trendy mug cakes took over the internet, resourceful bakers were reaching into their pantries for the humblest of vessels: the tin can. Whether you call it a canned cake, a coffee can bread, or simply a vertical sponge, this method produces a cylinder of cake that is uniform, incredibly moist, and visually striking when sliced into perfect rounds.
My first encounter with this technique wasn’t in a culinary school, but in my grandmother’s kitchen during a summer power outage. We used an old wood-burning stove and whatever clean cans were in the recycling bin. Since then, I’ve refined the process, testing different crumb structures and moisture levels to ensure the result isn’t just a novelty, but a high-quality dessert. If you are looking to expand your repertoire of unique bakes, you can browse our home baking collection for more creative inspiration, or learn how to properly freeze cake for later use. In my experience, once you master the thermal physics of baking in deep, narrow containers, a whole new world of portable gifting and camping desserts opens up.

The Science of the Cylinder: Why Use a Can?
You might wonder why we would bother with a can when we have perfectly good springform pans. The answer lies in heat distribution and moisture retention. Because a tin can is taller than it is wide, the batter is shielded from the direct, harsh dry air of the oven for a longer period. This creates a steam-baked environment within the can itself.
After testing this several times, I’ve found that the vertical rise allows for a much more even crumb. In a flat pan, the edges often overcook before the center is set. In a can, the heat must travel through the metal walls and penetrate the batter from all sides simultaneously. This results in a cake that is exceptionally dense (in a good, pound-cake sort of way) yet remarkably soft.
Essential Ingredients and Their Roles
For this recipe, we are aiming for a Vanilla-Buttermilk Base. This specific crumb is sturdy enough to hold its shape when slid out of the can but tender enough to melt on the tongue.
The Dry Base
- All-Purpose Flour (375g / 3 Cups): I prefer all-purpose over cake flour here. You need the moderate protein content to provide enough structure for the cake to climb the walls of the can without collapsing.
- Granulated Sugar (400g / 2 Cups): Sugar isn’t just for sweetness; it’s a humectant. It keeps the canned cake moist for days.
- Baking Powder (2 tsp) & Baking Soda (1/2 tsp): We use both because the buttermilk provides acidity that needs the immediate lift of soda, while the powder ensures a steady rise during the long bake time.
- Fine Sea Salt (1/2 tsp): To balance the sweetness and brighten the vanilla notes.
The Wet Emulsion
- Unsalted Butter, Softened (225g / 1 Cup): Fat is the primary tenderizer. Using butter instead of oil gives that classic gold medal flavor.
- Large Eggs (4, Room Temperature): One trick I always use is cracking the eggs into a bowl of warm water for 5 minutes before using. Room temp eggs emulsify much better, preventing the batter from breaking.
- Buttermilk (240ml / 1 Cup): The acidity in buttermilk breaks down gluten strands. The texture turns out best when the buttermilk is full-fat.
- Pure Vanilla Extract (1 tbsp): Since the can traps aromas, don’t skimp on the quality of your vanilla.
The Step-by-Step Method
1. Preparing the Pans (Safety First!)
I’ve found that the most important part of this recipe happens before the oven is even turned on. You must use cans that are BPA-free and do not have a plastic lining. Standard 14oz or 16oz vegetable or fruit cans work best.
- The Trick: Use a smooth-edge can opener to ensure there are no jagged rims. Wash them three times in hot, soapy water to remove all food residue.
- The Lining: Grease the inside with butter, then line the bottom and sides with parchment paper. Let the parchment stick up about 2 inches above the rim; this acts as a collar if the cake rises higher than expected.
2. The Creaming Stage
In a large bowl or stand mixer, beat the butter and sugar until the mixture is pale and fluffy (about 4–5 minutes), a process better understood through these essential baking terms explained. If you rush this step, your cake will be heavy and oily. We are looking to incorporate air bubbles that the leavening agents can later expand.
3. Emulsifying the Eggs
Add the eggs one at a time, beating thoroughly after each addition. If the batter looks curdled, add a tablespoon of your measured flour to help it bind back together.
4. The Alternating Addition
Add one-third of the dry ingredients, followed by half of the buttermilk. Repeat, ending with the dry ingredients. One trick I always use is to mix the final streaks of flour by hand with a spatula. This prevents overworking the gluten, which is the number one cause of tough canned cakes.
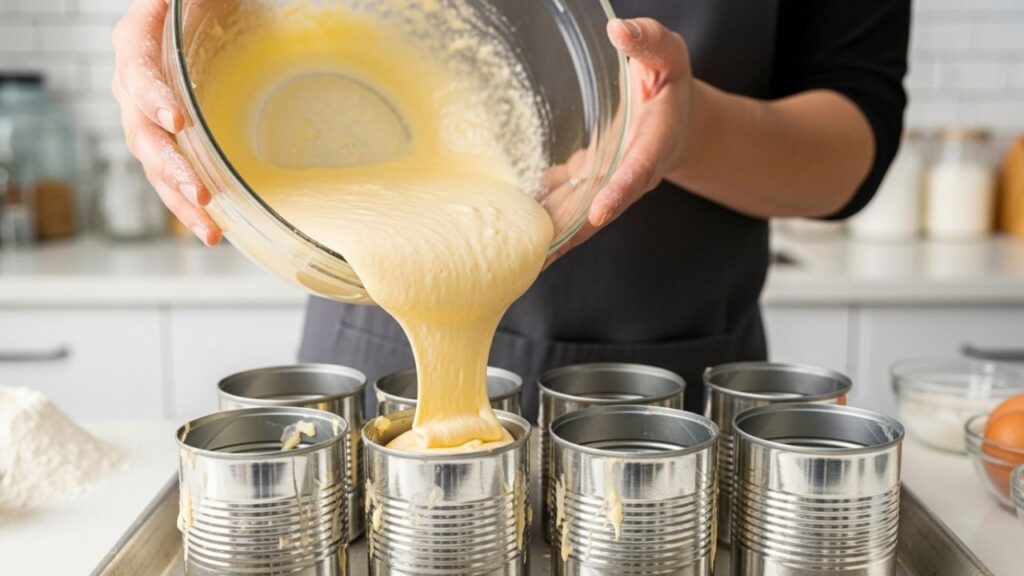
5. Filling and Baking
Fill each prepared can only halfway. If you fill it more, the center will remain raw while the top burns. Place the cans on a sturdy baking sheet to prevent them from tipping.
- Temperature: Bake at 350°F (175°C).
- Timing: Small 14oz cans usually take 35–45 minutes. Larger cans may take up to an hour.
Technique Insight Managing Heat Transfer in Metal
Baking in a tin can is different from baking in ceramic or glass. Tin is a highly conductive material, meaning it gets hot fast. However, because the vessel is narrow, the thermal mass of the cold batter in the center takes a long time to reach the necessary temperature for starches to gelatinize.
I’ve found that placing a small pan of water on the bottom rack of the oven (creating a water bath effect) helps regulate the temperature. This prevents the outer crust of the cake from becoming too thick or dark before the middle is fully baked. This is a form of indirect steam baking, a technique often used in commercial bakeries to achieve a uniform crumb without a hard shell.
Common Mistakes and How to Avoid Them
1. The Cake is Stuck in the Can
- Why it happens: Inadequate greasing or failing to use a parchment paper liner. Cans often have slight ridges inside that trap the cake.
- The Fix: If it’s stuck, run a thin, flexible offset spatula around the edges. If that fails, use a can opener on the bottom of the can and gently push the cake through.
- Prevention: Always use a parchment sleeve inside the can.
2. The Mushroom Top
- Why it happens: Filling the can too high (more than 60%). The batter expands and spills over the sides.
- The Fix: Trim the excess with a serrated knife once cooled.
- Prevention: Use the halfway rule and always use a parchment collar.
3. Raw Center, Burnt Edges
- Why it happens: Oven temperature is too high, causing the exterior to set too quickly.
- The Fix: Tent the tops with foil if they are browning too fast.
- Prevention: Use an oven thermometer to ensure you aren’t actually baking at 375°F when you think it’s 350°F.
4. Metallic Aftertaste
- Why it happens: Using a can that wasn’t properly cleaned or using a can with a reactive coating.
- Prevention: Stick to high-quality, plain steel or aluminum cans and ensure they are bone-dry before greasing.
Storage and Make-Ahead Advice
Canned cakes are the ultimate make-ahead dessert because the shape makes them incredibly easy to wrap.
- Room Temperature: Wrap the cooled cakes tightly in plastic wrap and then foil. They will stay moist for up to 4 days.
- Freezing: These cakes freeze beautifully. I recommend freezing them whole (in their cylinders) for up to 3 months. To serve, thaw overnight in the fridge while still wrapped to retain moisture.
- The Texture Shift: On day two, the moisture from the center of the cake tends to migrate toward the edges, making the entire slice perfectly uniform. In my experience, these actually taste better 24 hours after baking.

Serving Suggestions and Creative Twists
- The Strawberry Shortcake Round: Slice the cylinder into 1-inch thick discs. Layer with macerated strawberries and heavy whipped cream for a modern take on a classic.
- The Grilled Donut: Lightly butter both sides of a cake slice and sear it in a cast-iron skillet for 60 seconds per side. Serve with vanilla bean ice cream.
- The Campfire Treat: If you are camping, you can actually bake these in a Dutch oven over coals. It’s the ultimate roughing it luxury.
- Autumn Spice Variation: Replace the buttermilk with pumpkin puree and add 2 teaspoons of cinnamon and 1/2 teaspoon of ground ginger.
Final Thoughts
After testing this several times, I am always struck by how a simple change in geometry can completely transform a familiar recipe. Baking a cake in a can isn’t just a clever recycling trick or a fun weekend experiment; it is a legitimate baking technique that yields a specific, tight-crumbed texture that is nearly impossible to replicate in a wide, flat pan. In my experience, the real joy of this recipe comes from the surprise.
There is something incredibly satisfying about pulling a perfect, golden cylinder out of a humble tin and slicing it into elegant, uniform rounds. It challenges the idea that you need expensive, specialized equipment to create a dessert that looks professional and tastes sophisticated. As long as you prioritize safety with your choice of cans and have the patience to let the centers bake through, and understand freezing different types of cakes effectively, you’ll find that this ‘vintage’ method quickly becomes a modern favorite in your kitchen. Whether you’re gifting these to neighbors or serving them at a backyard dinner party, they are guaranteed to start a conversation before the first bite is even taken.
Frequently Asked Questions
1. Is it safe to bake in a tin can?
Yes, provided you use cans that are labeled BPA-free and do not have a plastic or white epoxy lining, which can release fumes at high temperatures. For the most accurate safety guidelines on food-grade containers, you can consult the USDA Food Safety and Inspection Service.
2. Can I use a boxed cake mix for this?
Absolutely. One box of standard mix will usually fill three 14oz cans (filled halfway). However, you may need to reduce the baking temperature to 325°F as box mixes often contain more sugar, which browns faster.
3. Why do I need a parchment paper collar?
The collar acts as an insurance policy. If the cake rises more than expected, the paper guides it upward rather than allowing it to spill over the metal rim, which would make the cake impossible to remove without breaking.
4. How do I know when the cake is done?
Because the vessel is deep, a standard toothpick might not be long enough. I’ve found that using a clean wooden skewer is best. It should come out with a few moist crumbs, but no wet batter.
5. Can I bake these in a slow cooker?
Yes! You can place the filled cans inside a slow cooker with an inch of water at the bottom. Cook on High for 2–3 hours. This creates an incredibly moist, steamed pudding texture.
Henry James is the writer behind Fooodies.site, where he shares easy recipes, practical cooking guides, and simple kitchen tips for everyday home cooks. He enjoys experimenting with flavors and turning everyday ingredients into delicious, homemade meals. His goal is to make cooking feel simple, enjoyable, and achievable for everyone. He focuses on creating clear, well-tested content that readers can trust and follow with confidence.