
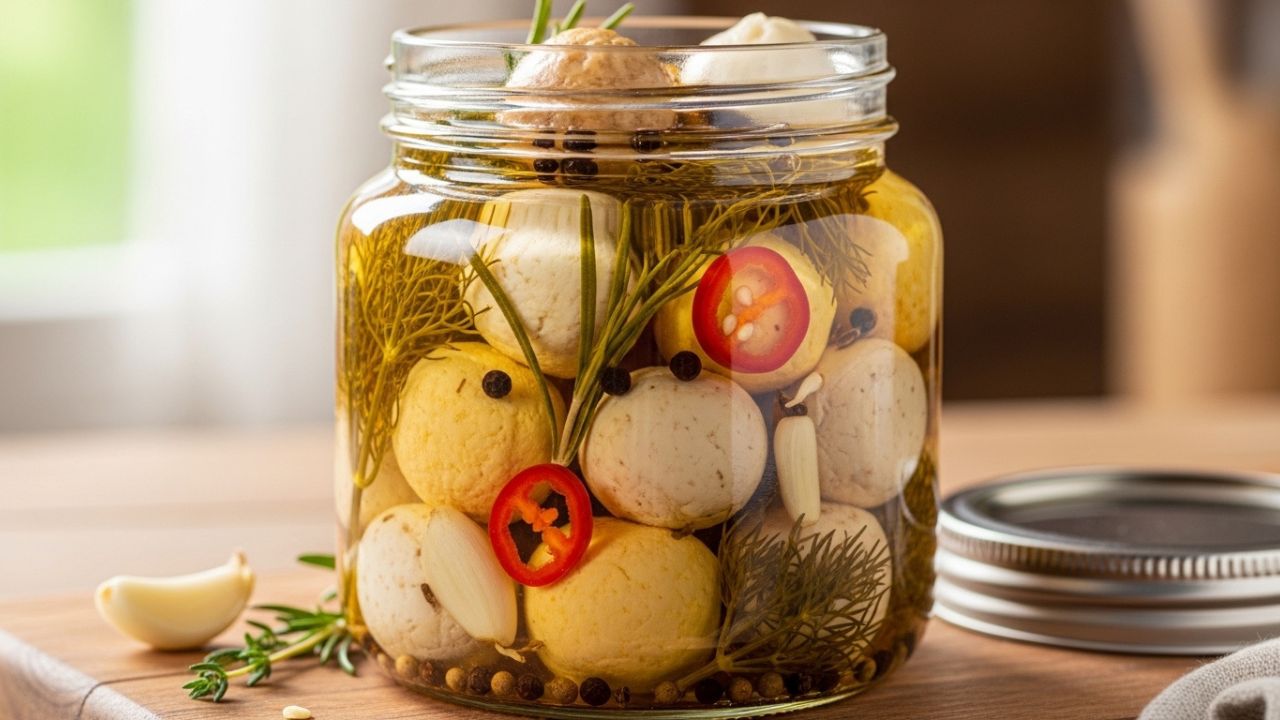
There is something undeniably sophisticated about a jar of hand-rolled cheese marinating in a bath of herb-infused oil. Long before I began developing recipes professionally, I remember being mesmerized by the specialty jars at European delis—those perfectly white spheres of goat cheese suspended in liquid gold. They seemed like a culinary secret reserved only for high-end cheesemongers.
However, after testing this several times in my own kitchen, I’ve found that the process is as rewarding as it is simple. Making pickled cheese balls is less about the “vinegar pucker” we associate with cucumbers and more about a slow, savory infusion that transforms the texture of the cheese into something velvety and complex. It is the ultimate “low-effort, high-impact” addition to a charcuterie board. If you are preparing for a gathering and want to balance the salt with something sugary, feel free to visit our homepage for more sweet ideas while your cheese cures in the fridge.
In my experience, the secret to a successful batch isn’t just the cheese itself, but the way you handle the aromatics. One trick I always use is “bruising” my fresh herbs before they enter the oil; it releases the essential oils without making the marinade cloudy. This guide will walk you through the nuances of fat ratios, safety protocols, and the best flavor combinations I’ve discovered over years of kitchen trials.

The Essential Ingredient Breakdown
To achieve a bakery-quality or deli-standard result, you cannot simply throw any cheese into any oil. The chemistry of the fats must be compatible.
1. The Cheese (The Foundation)
- Measurement: 450g (approx. 1 lb) of semi-firm Goat Cheese (Chèvre) or a high-quality Feta.
- Why it matters: You need a cheese with a relatively low moisture content but a high fat percentage.
- Texture Impact: If you use a cheese that is too soft, it will lose its shape and turn the oil into a murky paste. If it’s too hard, the oil won’t penetrate the core. Chèvre is my favorite because it maintains a creamy “melt” while holding its spherical form.
2. The Oil Blend (The Carrier)
- Measurement: 350ml (1.5 cups) Extra Virgin Olive Oil and 120ml (0.5 cup) Grapeseed or Avocado Oil.
- Why it matters: Pure extra virgin olive oil has a tendency to solidify and turn cloudy in the refrigerator.
- Substitution: I’ve found that a 3:1 ratio of olive oil to a neutral, liquid-stable oil (like grapeseed) keeps the jar looking crystal clear and pourable even when chilled.
3. The Aromatics (The Flavor Profile)
- Garlic: 3-4 cloves, peeled and lightly smashed.
- Fresh Herbs: 3 sprigs of Rosemary and 4 sprigs of Thyme.
- Peppercorns: 1 tablespoon of whole black or pink peppercorns.
- Acid: 1 tablespoon of White Balsamic or Champagne Vinegar.
- Why it matters: The vinegar doesn’t preserve the cheese here—it acts as a “brightener” to cut through the heavy lipids of the oil and cheese.
Hand-Rolling to Perfection
Step 1: Chilling and Shaping
In my experience, you should never try to roll cheese at room temperature. The fat begins to melt, and you’ll end up with more cheese on your palms than in the jar.
- Action: Chill your cheese in the freezer for 10 minutes before starting.
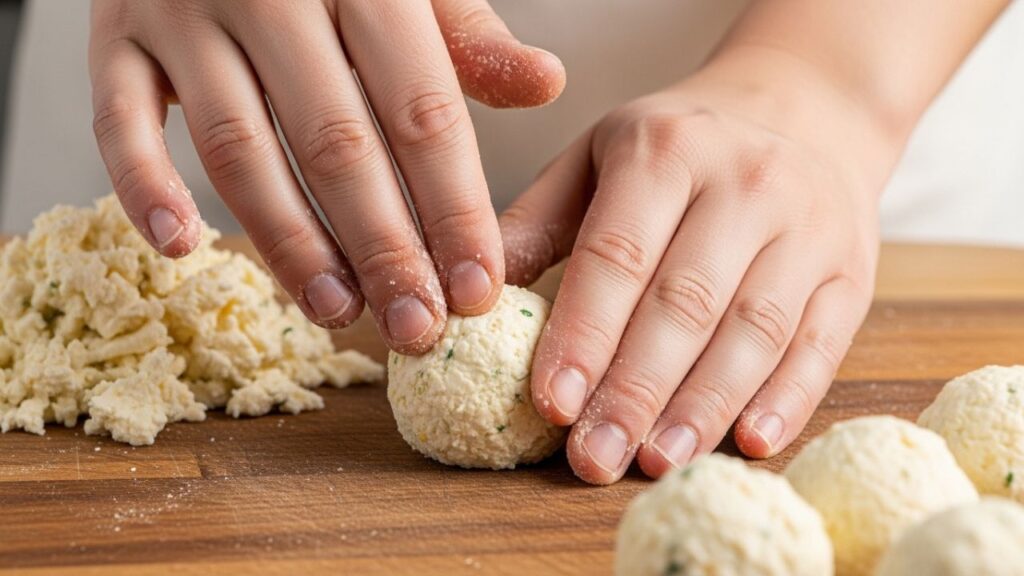
- The Technique: Use a small cookie scoop or a teaspoon to portion out roughly 15g (about 1 tablespoon) of cheese. Roll it quickly between your palms to form a smooth sphere.
- Visual Cue: The balls should look like large marbles. If they start to look “shaggy” or rough, your hands are too warm. Rinse your hands in cold water and dry them before continuing.
Step 2: Preparing the Aromatics
One trick I always use is briefly heating the aromatics in a small portion of the oil.
- Action: Take 50ml of your oil and put it in a small saucepan with the garlic, peppercorns, and herbs. Heat on the lowest setting for only 2-3 minutes.
- Why it matters: You aren’t “cooking” the herbs; you are waking them up. This ensures the infusion starts the moment the oil hits the cheese. Crucial: Let this oil cool completely to room temperature before moving to the next step.
Step 3: Layering the Jar
After testing this several times, I’ve found that the order of operations prevents the cheese balls from bruising each other.
- Action: Place half of your cooled herbs and garlic at the bottom of a sterilized 500ml glass jar.
- The Build: Carefully drop in the cheese balls, one by one. Do not pack them down; let gravity settle them.
- The Finish: Tuck the remaining herbs into the sides of the jar for a beautiful visual presentation.
Step 4: The Submersion
Slowly pour the combined oils and the tablespoon of vinegar over the cheese.
- Texture Cue: Ensure the oil level is at least half an inch above the top cheese ball. Any cheese exposed to air will oxidize and develop an “off” flavor.
- Timing: Tap the jar gently on the counter to release air bubbles. Seal tightly.
Step 5: The Mellowing Period
I’ve found that the texture turns out best when the jar sits in the refrigerator for at least 48 hours. This allows the fat-soluble flavors of the rosemary and garlic to fully permeate the center of the cheese spheres.
Technique Insight: The Science of Lipid Infusion
Understanding fat-soluble vs. water-soluble flavors is key to gourmet infusion. Most of the flavor compounds in rosemary (cineole) and garlic (allicin) are lipid-soluble. This means they bond more effectively with oil than with water.
When we submerge the cheese in oil, we are creating a “flavor bridge.” The oil extracts the essence from the herbs and then, through a process of slow diffusion, transfers those molecules into the fat of the cheese. This is why “pickled” cheese balls don’t just taste like cheese with oil on them; the flavor actually becomes part of the cheese’s molecular structure. Additionally, the oil acts as a barrier against oxygen, which is why the cheese stays fresh and creamy for longer than it would in its original packaging.
Common Mistakes and How to Fix Them
1. Using Wet Herbs
- The Problem: If you wash your herbs and don’t dry them completely, you introduce water into an oil environment. This can lead to the growth of bacteria (specifically Clostridium botulinum).
- The Fix: Wash your herbs a day in advance and let them air-dry until they are bone-dry to the touch.
- Prevention: Use a salad spinner and then pat them down with a paper towel.
2. Crowding the Jar
- The Problem: Packing the cheese balls too tightly prevents the oil from circulating. You’ll end up with “flat spots” on the cheese that haven’t been seasoned.
- The Fix: If you’ve overpacked, simply move half the contents to a second jar.
- Prevention: Use a wider-mouthed jar than you think you need.
3. Using Poor Quality Oil
- The Problem: The oil is 50% of the flavor. If you use a cheap, bitter olive oil, the cheese will taste metallic.
- The Fix: Taste your oil before you pour. If it doesn’t taste good enough to dip bread into, it isn’t good enough for pickling.
- Prevention: Use an “Everyday” Extra Virgin Olive Oil rather than a “Robust” one to keep the flavor balanced.
4. Ignoring Temperature
- The Problem: Adding hot oil to cold cheese.
- The Fix: If you melt the cheese, there is no saving the shape. You can turn it into a dip, but it won’t be “pickled cheese balls” anymore.
- Prevention: Always use a kitchen thermometer to ensure your oil is below 25°C (77°F) before pouring.
5. Storing in the Fridge Door
- The Problem: The temperature in the fridge door fluctuates too much.
- The Fix: Move the jar to the back of the bottom shelf.
- Prevention: Consistent cold is the key to food safety when dealing with oil infusions.
Storage & Make-Ahead Section
- Refrigeration: These must be stored in the refrigerator. Because of the inclusion of fresh garlic in an anaerobic (oil) environment, room temperature storage is a major safety risk. For more on safe food handling, you can consult the USDA’s guidelines on home food preservation.
- Shelf Life: In my experience, these are best consumed within 7 to 10 days. Beyond that, the garlic flavor can become too pungent and the cheese may begin to soften excessively.
- Make-Ahead: These are actually better if made 3 days in advance. I never serve them the day I make them.
- The Leftover Oil: Do not throw the oil away! Once the cheese is gone, you have a high-end herb-and-garlic-infused oil. Use it for sautéing vegetables, dressing pasta, or as a base for a vinaigrette.
- Freezing: I do not recommend freezing this recipe. The ice crystals will break the emulsion of the cheese, resulting in a grainy, sandy texture once thawed.

Serving Suggestions & Seasonal Variations
- The Mediterranean Classic: Serve on a wooden board with toasted baguette slices, Kalamata olives, and a drizzle of honey to contrast the salt.
- The Spicy Kick: Replace the rosemary with dried bird’s eye chilies and lemon zest. This is a favorite for those who like a slow-burn appetizer.
- The Autumn Harvest: Use Feta pickled cheese balls and add toasted walnuts and dried cranberries to the jar. The nuts pick up the herb flavor beautifully.
- The Cocktail Garnish: Use very small balls (the size of a chickpea) and skewer them into a martini or a savory gin and tonic. It’s an unexpected and classy touch.
Conclusion
The beauty of pickled cheese balls lies in their ability to turn humble, everyday ingredients into a centerpiece of culinary craft. Through the simple science of lipid infusion and a little bit of patience, you can create an appetizer that rivals any professional catering spread.
As we have explored, the keys to success are maintaining the right temperature, choosing high-quality fats, and respecting the “mellowing” period in the fridge. In my experience, the most rewarding part of this recipe isn’t just the final taste, but the creative freedom it allows. Once you master the base technique of rolling and submerging, you can begin to experiment with your own garden herbs, different citrus zests, or even smoked oils.
Don’t be intimidated by the idea of “pickling” dairy. Approach it with the confidence of a seasoned maker, follow the safety protocols regarding dry herbs and refrigeration, and you will have a sophisticated staple that you can turn to time and time again. There is a deep satisfaction in cracking open a jar you made yourself and seeing those perfectly infused spheres ready to be shared. pickled cheese balls Happy making!
FAQs
1. Is it safe to put raw garlic in oil for these cheese balls?
Yes, but only if kept refrigerated. Raw garlic in oil at room temperature can create an environment for botulism. By keeping the jar in the back of the fridge and consuming it within 10 days, you maintain a safe and delicious product.
2. Why did my oil turn solid and white in the fridge?
This is a natural reaction of olive oil to cold temperatures. It does not mean the oil is bad! Simply set the jar on the counter for 15–20 minutes before serving, and the oil will return to its liquid, golden state.
3. Can I use dried herbs instead of fresh?
Absolutely. In some ways, dried herbs are safer because they contain zero moisture. However, the flavor will be more concentrated, so use about half the amount of dried herbs as you would fresh.
4. What is the best way to clean the jar for this recipe?
I recommend running your glass jar through a high-heat dishwasher cycle or boiling it in water for 10 minutes. Ensure it is completely air-dried before adding any oil or cheese.
5. Can I use this method for Mozzarella pearls?
Yes! Fresh Mozzarella pearls (Bocconcini) are excellent for pickling. However, since they have a higher water content than goat pickled cheese balls, they should be eaten within 5 days as they can become “rubbery” if left too long in the oil.
Henry James is the writer behind Fooodies.site, where he shares easy recipes, practical cooking guides, and simple kitchen tips for everyday home cooks. He enjoys experimenting with flavors and turning everyday ingredients into delicious, homemade meals. His goal is to make cooking feel simple, enjoyable, and achievable for everyone. He focuses on creating clear, well-tested content that readers can trust and follow with confidence.